SOLAR PANEL INSTALLATION
Solar Partner installs commercial, agricultural or residential solar PV system in accordance with MCS regulations. All works will be undertaken to a high standard.
This is fully backed up by our references of jobs completed more than 9 years ago that are still performing well. Solar Partner carries full liability insurance up to £2M for your peace of mind.
Call Solar Partner on 07919 686 076 for a FREE site inspection/survey. We install within a 50 miles from Milton Keynes.
Make your own...electric.
Save your own...electric.
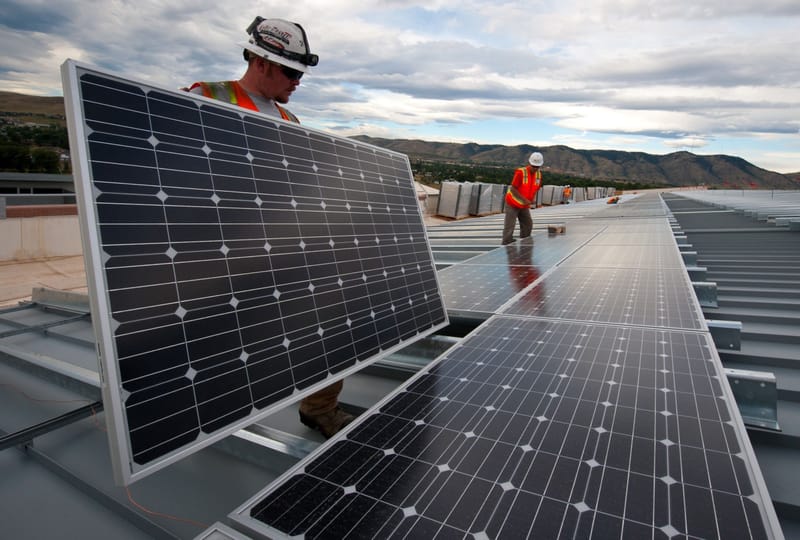
Some examples of the types of mounting systems we use are shown below -
 | In-roof systems are typically for residential buildings. The solar panels are in-line with the roof tiles. A back sheet is behind the panels to prevent water ingress. Advantages of this system are birds and squirrels can not nest under the panels, however the panels do get very hot in the summer due to the lack of air flow behind the panels. This can reduce performance of the panels. Suitable for new builds when the roof tiles do not need to be removed. |
 | Roof hooks - stainless steel roof hooks that fix directing to your roof rafters. Typically used for retro fitting a system to a residential building. Solar Partner always ensures that the hooks do not touch the roof tiles. This will prevent the tiles under the hooks from cracking. Advantages of raising the panels over the roof tiles is that a good flow of air disperses the heat and cools the panels in the height of summer, so they are more efficiency. Furthermore, with roof tiles behind the panels any risk of a fire spreading into the the building is reduced. Disadvantages, are that birds and squirrels can nest under the panels. Therefore, netting is required that increase costs. |
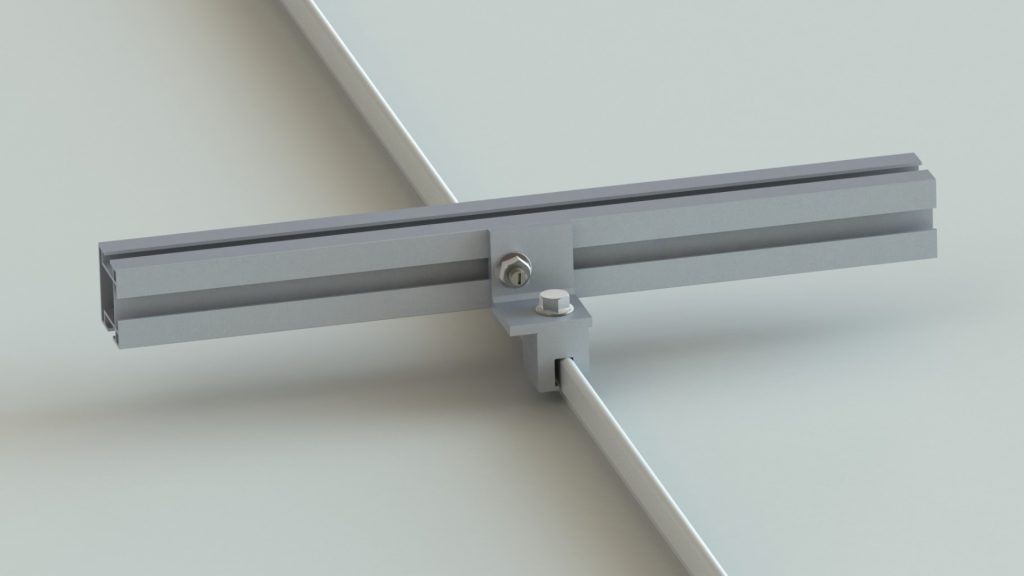 | Standing seam flat sheet roofs. This system does not penetrate the metal sheet roof. The rails are clamped onto the standing seam. Typically for commercial buildings. |
 | Stainless steel hangar bolts for corrugated roof sheets. Bolts are fixed into the steel z purlins or into timber purlins. Typically profiled sheets are on agricultural and industrial buildings. A great deal of care needs to be taken. The sheet are fragile and crawl boards and fall arrest systems must be used. Sheets could be made of asbestos requiring specialist equipment and attention. |
 | Aluminium frames for flat roof solutions. The solar panels can be mounted in a portrait or landscape configuration. This system will require mounting to the roof structure or ballast (like paving slabs) to weigh the panels and frame down. If the panels are higher than the highest point of the building, planning approval will be required. |
 | Ground mount systems - suitable for large systems where there is suitable land available. Quick, easy and effective ground screws that are driven into the soil reducing the need for concrete. Made from stainless steel and aluminium ensures the structure will last and look good for more than 25 years. For large systems planning approval will be required. |
House  | Office  | Agriculture  | Car Park  |
Step by Step Solar PV Installation Process -
Step 1 – Acceptance of quotation
Please contact Solar Partner either verbally or via email instructing that you would like to proceed with the works.
Step 2 – Contract
Solar Partner will email a copy of the Agreement to the Customer. Please sign return in 2 locations and return to Solar Partner (clear photos of signatures are accepted). Once Agreements have been signed, returned and any deposit monies paid this will initiate the installation process. All deposits paid are held in Solar Partner’s “Client Account”.
Step 3 Pre-installation works
Following Contract signature, several activities may be carried out in parallel before the start of installation works. These include:-
Change electric meter (if necessary) – The Customer should contact their electricity supplier if they have a old dial meter as the meter could run backwards once the PV system has been commissioned. This could result in the utility company estimating the supply meter reading which in some circumstances the Customer may pay too much.
The Customer should contact their electricity provider to obtain export payments form.
Wiring and/or fuse-board upgrades (if necessary) - Customer or Solar Partner to carry-out these works by agreement
Application to the electricity supplier for connection of the system to the grid - Solar Partner will do if required
Planning Permission Application - Solar Partner can do on behalf of the Customer if required.
Step 4 – Agree start date
Solar Partner will contact the Customer to agree a convenient start date a week prior to the installation.
Step 5 – Erection of scaffolding
This normally takes less than 4 hours for a typical building and is carried out on the day before the roof installation starts – however, this may be affected by the weather or other circumstances. Please ensure that there is parking available for vans / lorry and that the area in front of the solar PV area is cleared of any obstructions.
Step 6 - Installation of PV system
Our installers aim to arrive to site at approximately 9.0 am. Please show them around the building and advise them of any issues that they should be aware of.
Solar Partner only uses high quality equipment, including Schletter PV mounting Systems. The roof brackets will be fixed securely to the building structure and the roof made watertight. The panels are then installed. The Customer does not need to be in the building whilst these works are carried out providing access to the roof can be obtained without the Customers assistance.
Step 7 - Installation of Inverter and Electrical Cabling and Equipment
The inverter (the device that converts the DC electricity from the panels to AC as used in the building) is normally installed in the attic or other accessible location like the garage. Cable is run from the solar panels to the inverter and from the inverter to the meter cupboard or fuse-board. Where cabling is exposed, conduit may be provided for protection. Isolator switches are also installed that allow the system to be made safe if repairs are ever required to the roof or electrical supply and a Generation Meter is connected in circuit for recording and displaying the amount of electricity produced by the system. The Customer should ensure access into the building whilst these works are carried out.
Step 8 - System Commissioning
The final commissioning of the system includes switching the system on, together with checks to ensure that everything is functioning correctly. It may be necessary for the main electricity supply in the property to be temporarily switched off while the main connection is made.
Step 9 – Final payment and certification
Once final payment is cleared, Solar Partner will email to the Customer the MCS Certificate and register the system on the MCS database (without which the electricity supply company will not make the FIT export payments). Solar Partner will also provide a comprehensive Operation & Maintenance Manual comprising:-
Equipment data sheets
Electrical system schematic diagram
Commissioning Certificates
Operating instructions
Maintenance recommendations
Instruction on how to operate the system
Insurance voucher (customer to complete and return to the insurer to validate)
Step 10 - Removal of scaffolding
The scaffolding will be removed and site cleared of any installation debris once full payment has cleared.
Step 11 - Application for Export Payments payments
Once the Customer receives the MCS Certificate via email from Solar Partner, the Customer should complete all personal information on the Export application form (Solar Partner will assist with any technical questions).
Step 12 – Completion
Project complete – The Customer can enjoy the knowledge of generating their own clean, green electricity, savings on energy bills, and reducing their carbon footprint. Try and use all the power that your solar panels generate this will saving you buy electricity from your utility supplier.
Step 13 - Export payments
The electric company should contact the Customer quarterly and request a Generation Meter reading for export payments. This reading should be taken from the Generation Meter ONLY.
Step 14 – Approvals
The Customer should receive letters of approval from –
The Grid Operator (DNO) – confirming that permission is granted for grid connection (if required).
ELECSA – this organisation is authorised by Communities and Local Government to deliver a competent persons scheme. This enables contractors to self certify domestic electrical work under Part P of the building regulations.
Planning Department (if required).
No action is required unless indicated. Please keep all documents in a safe place.